How to Install Solar Panels on Your Home: The Complete 2026 Guide
How to install solar panels on your home, step by step: roof checks, sizing, PM Surya Ghar subsidy up to ₹78,000, net metering, installation and commissioning.


India crossed 162.15 GW of installed solar capacity by 30 June 2026, up from roughly 3 GW in 2014. In FY 2025-26 alone the country added 44.61 GW of solar, nearly double the 23.83 GW added the year before, and 8.7 GW of that came from rooftop systems on buildings like yours.
The residential push is driven by the PM Surya Ghar Muft Bijli Yojana, launched on 13 February 2024 with an outlay of ₹75,021 crore and a target of one crore households. It is the world's largest domestic rooftop solar programme. As of March 2026 the scheme had crossed 26.21 lakh rooftop installations totalling 9.56 GW, and MNRE reported over 43 lakh households solarised by June 2026, with ₹14,771.82 crore disbursed as Central Financial Assistance up to December 2025. More than 7.7 lakh of those households now receive a zero electricity bill.
Key takeaways
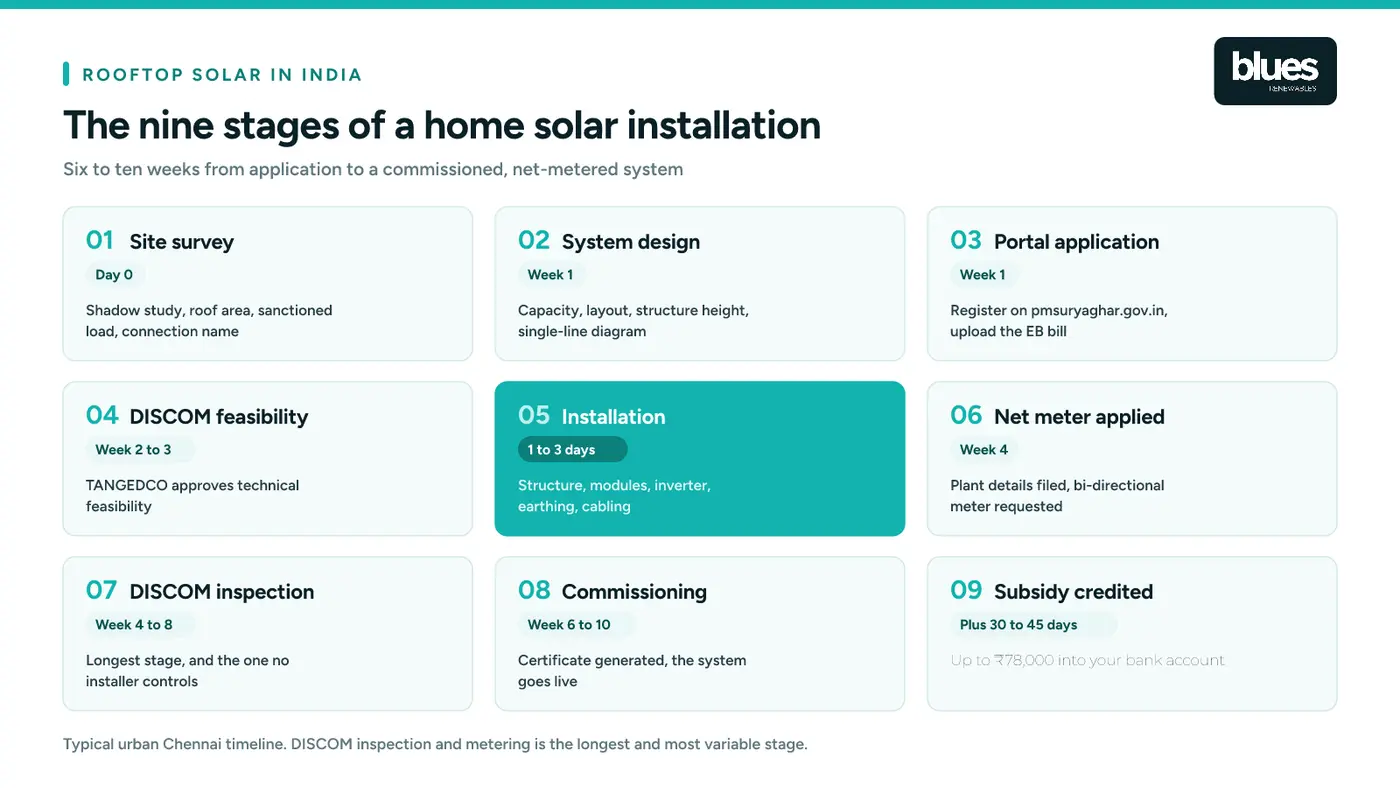
- The physical installation is the short part. Panels go up in one to three days. Approvals, net metering and inspection are what stretch the project to six to ten weeks.
- Size the system from your bill, not from your roof. A home consuming about 300 units a month needs roughly 2 kW to 3 kW. Roof space only sets the ceiling.
- The subsidy stops rising at 3 kW. PM Surya Ghar pays ₹30,000 per kW for the first 2 kW and ₹18,000 for the third, capping at ₹78,000 no matter how large the system is.
- The subsidy is a reimbursement, not a discount. You pay the installer in full, and the money reaches your bank account 30 to 45 days after commissioning.
- Two things stall more applications than anything technical: a system sized above your sanctioned load, and an electricity connection still registered in a parent's or previous owner's name.
- Only a registered vendor's installation qualifies. A self-installed system forfeits the subsidy, will not get net metering sanctioned, and voids most manufacturer warranties.
- Hardware must be ALMM-listed. Non-compliant modules disqualify the entire subsidy claim, however good the price looked.
How to install solar panels on your home
To install solar panels on your home, survey the roof for shadow-free area and sanctioned load, size the system from your electricity bill, apply on the PM Surya Ghar portal, get DISCOM feasibility approval, have a registered installer erect the mounting structure and modules over one to three days, then complete net metering, inspection and commissioning. In India the full process takes six to ten weeks, and a residential system qualifies for a central subsidy of up to ₹78,000.
For a homeowner the arithmetic is simpler than the national numbers. A rooftop system in a city like Chennai generates about 4.8 units per kilowatt per day across roughly 5.3 peak sun hours, runs for 25 years, and typically pays for itself in four to six years. Everything below is how you get from an electricity bill to a commissioned system.
Step 1: Check whether your roof is actually solar-ready
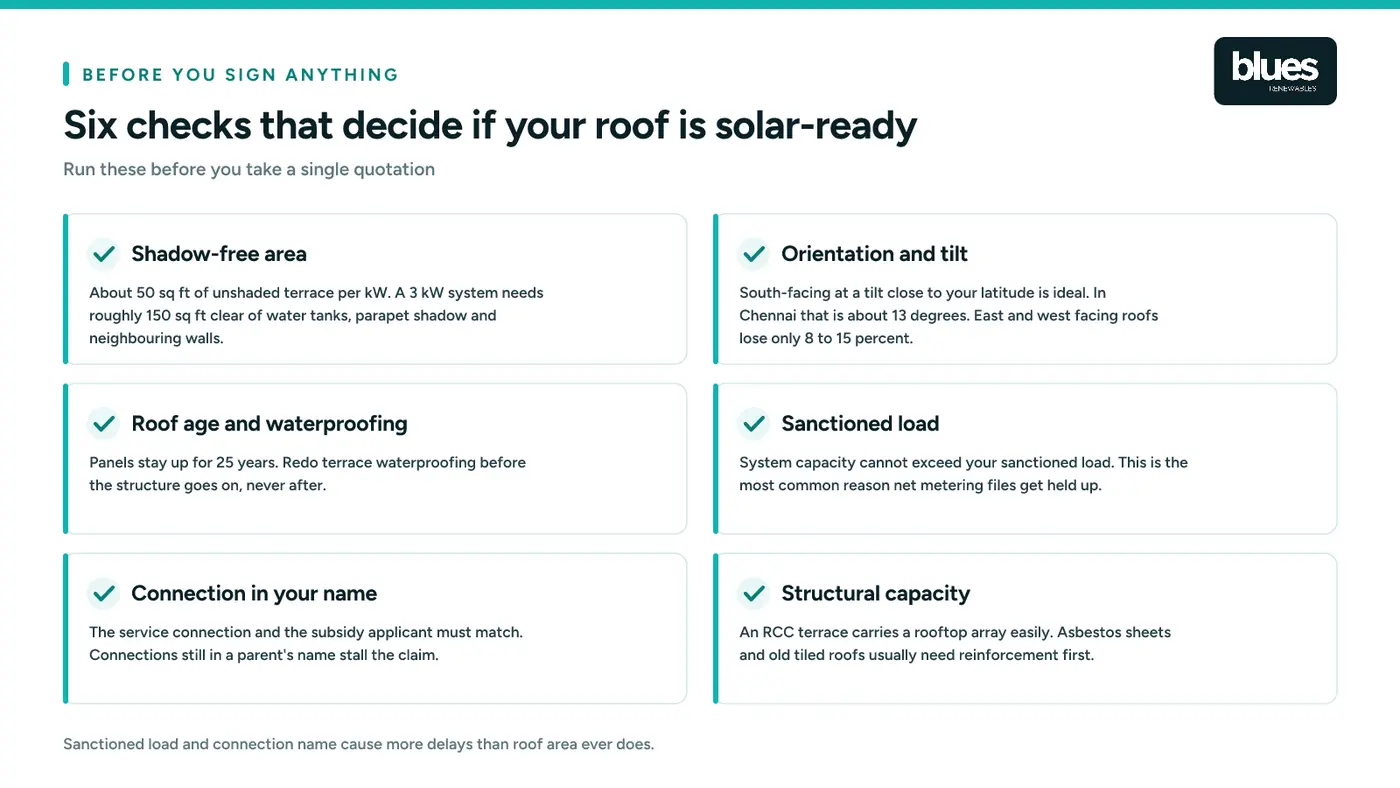
This is the step homeowners skip, and it is the one that decides whether the project is smooth or painful. Six checks matter.
Shadow-free area. Budget about 50 square feet of unshaded roof per kilowatt. A 3 kW system needs roughly 150 square feet, a 5 kW system around 250 square feet. What counts is area clear of shadow between roughly 9 am and 4 pm, so overhead tanks, staircase headrooms, parapet walls and the neighbour's upper floor all subtract from usable space. Shading is not proportional either: with a string inverter, one shaded module can drag down the output of the whole string.
Orientation and tilt. In the northern hemisphere a south-facing array at a tilt close to your latitude captures the most annual irradiance. In Chennai that latitude is about 13 degrees. East and west facing roofs are still perfectly viable, typically losing only 8 to 15 percent against true south. A flat RCC terrace is the easiest case of all, because the mounting structure sets the tilt and azimuth regardless of how the building faces.
Roof age and waterproofing. The array will sit there for 25 years. If the terrace needs waterproofing or the roof needs recoating, do it before the structure is anchored, never after. Dismantling and reinstalling an array to fix a leak is an avoidable expense.
Sanctioned load. Your system capacity cannot exceed the sanctioned load on your electricity connection. This is the single most common reason net metering applications get held up, and the fix, a load enhancement application, is best filed in parallel with the solar application rather than after it gets rejected.
Connection in your name. The subsidy application and the net metering application are both tied to the service connection number. Many homes still carry a connection in a parent's, grandparent's or previous owner's name years after the property changed hands. The applicant name must match, so check this on day one.
Structural capacity. A reinforced concrete terrace carries a rooftop array comfortably, typically adding 12 to 20 kg per square metre. Asbestos sheets, old Mangalore tile roofs and lightweight sheds usually need reinforcement or a purlin-level assessment first.
Step 2: Size the system from your electricity bill
Sizing is a bill exercise, not a roof exercise. Pull out your last twelve months of bills and find your average monthly consumption in units (kWh). Then divide by the generation you can expect locally.
At 4.8 units per kW per day, one kilowatt produces roughly 144 units a month, or about 1,500 to 1,600 units a year. So:
- Around 150 units a month points to a 1 kW system
- Around 300 units a month points to 2 kW
- Around 430 units a month points to 3 kW, the most installed residential size in India
- Around 720 units a month points to 5 kW
Two adjustments are worth making. First, if you are planning an air conditioner, an EV charger or an extension in the next couple of years, size for that consumption now rather than retrofitting later. Second, oversizing far beyond your own consumption rarely pays. Surplus units carry forward as credit, but any credit unused at annual settlement is compensated at a regulator-fixed rate that is lower than the retail tariff you would otherwise have offset.
If you want to run the numbers against your own bill instead of a rule of thumb, the Blues Renewables solar calculator reads a bi-monthly bill amount back through the domestic tariff slabs and returns a recommended capacity.
For a full breakdown by capacity, including what changes the number in a real quotation, see solar panel prices in Chennai.
Step 3: Choose the system configuration
There are three configurations, and the right one depends on how reliable your grid supply is rather than on which sounds most advanced.
On-grid, also called grid-tied. No batteries. The system powers your home during the day and exports the surplus to the distribution utility for bill credit through net metering. It has the lowest cost per kilowatt, the fewest components to fail, and it is the configuration the subsidy is designed around. Its one limitation is that it shuts down during a power cut, by design, so that linesmen are not working on a line your roof is energising.
Off-grid. A battery bank stores the day's generation and runs the house independently. It suits locations with no grid connection or genuinely unreliable supply, costs substantially more per kilowatt, and is not eligible for the residential subsidy. Batteries also need replacement every five to ten years depending on chemistry.
Hybrid. A hybrid inverter runs grid-tied but keeps a battery to back up selected circuits during outages. It is the middle option on cost, claims the subsidy on the solar portion, and is the hardest of the three to specify correctly, because the backed-up load list has to be decided before the wiring is designed.
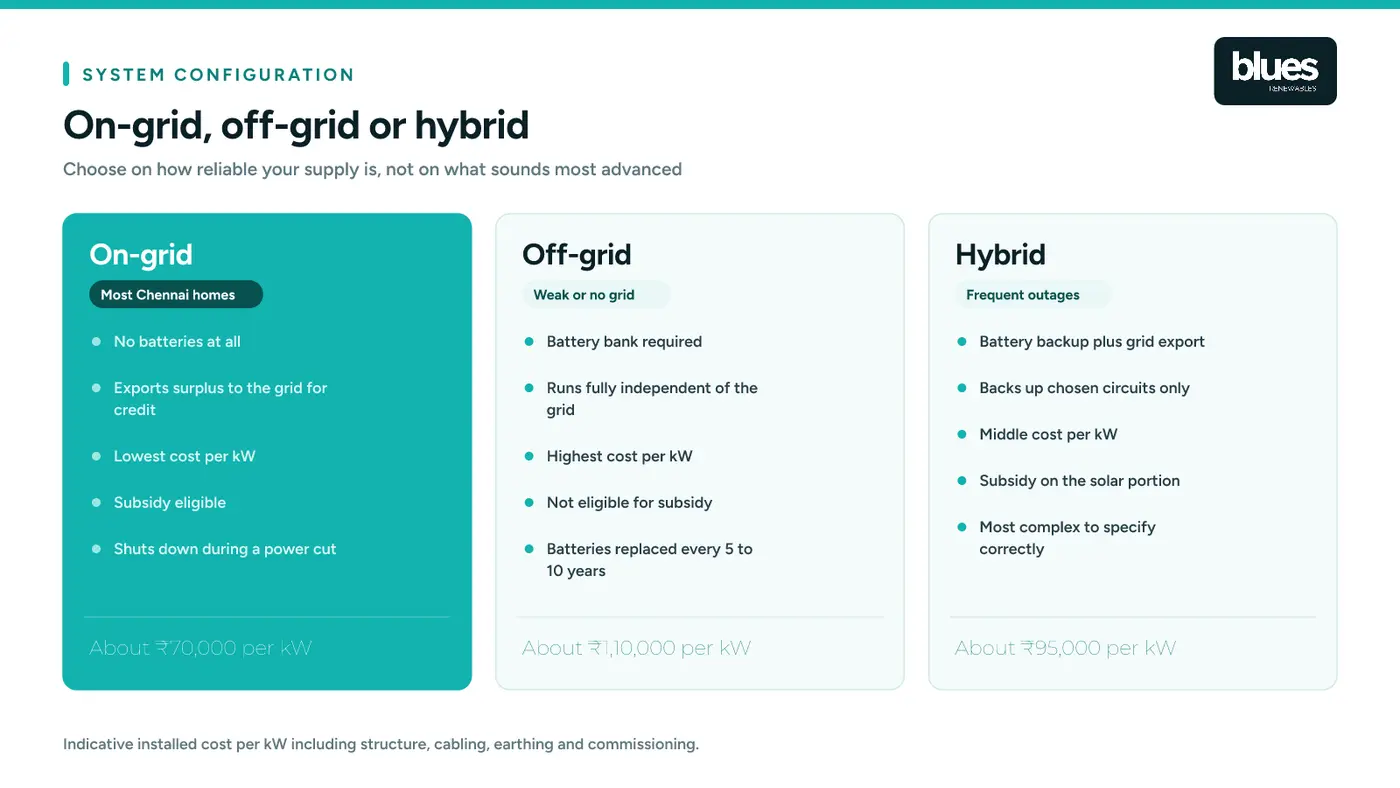
Most urban homes with a stable connection should default to on-grid. If you are weighing the trade-offs against frequent outages, the detailed comparison in on-grid vs off-grid vs hybrid solar systems works through the cases where a battery earns its cost.
Step 4: Specify the equipment properly
A quotation is only comparable to another quotation if you know what each line means.
Solar modules. Most residential systems in India now use monocrystalline panels, commonly mono PERC or TOPCon, in the 545 W to 590 W range. They produce more power per square foot than polycrystalline, which matters on a constrained roof, and hold up better in low light. Whatever you choose, the modules must be ALMM-listed (on the Approved List of Models and Manufacturers) and carry BIS certification, because non-compliant modules disqualify the subsidy claim outright. Expect a 25 to 30 year performance warranty with degradation around 0.5 percent a year, and a separate, shorter product warranty covering manufacturing defects.
Inverter. A string inverter is the standard and cheapest choice, and works well when the array is unshaded and coplanar. Microinverters or DC optimisers cost more but let each module perform independently, which is worth considering on a roof with unavoidable partial shading or panels on two different orientations. Check the inverter's efficiency rating, its warranty term, and whether it comes with generation monitoring you can actually access.
Mounting structure. This is where quotations diverge the most and where cheap systems fail first. Hot-dip galvanised iron is the norm. Structure height matters on Indian terraces: a raised structure of four to nine feet keeps drying lines, water tanks and the sump inlet usable underneath and makes cleaning easier, but taller structures need heavier sections and deeper foundations, so the cost moves with height. In coastal cities the structure must be designed to the site's wind loading under IS 875 Part 3. Chennai sits in a 50 m/s basic wind speed zone, roughly 180 km/h, with a cyclone importance factor applied on top. Rooftop arrays fail at the fasteners and the structure, not at the glass.
Balance of system. The parts nobody mentions until something goes wrong: DC and AC distribution boxes with surge protection, UV-rated DC cable in conduit, MC4 connectors, an earthing system with separate pits for AC, DC and lightning protection, and a lightning arrester where the site warrants one. Ask for these to be itemised.
Step 5: Apply for the subsidy and choose a registered installer
Applications run through the national PM Surya Ghar portal at pmsuryaghar.gov.in, with your state distribution company as the implementing DISCOM. In Tamil Nadu that is TANGEDCO, formally renamed TNPDCL in the 2024 restructuring, though both names still appear on paperwork.
The subsidy is calculated in two slabs:
- 1 kW - Central subsidy: ₹30,000
- 2 kW - Central subsidy: ₹60,000
- 3 kW - Central subsidy: ₹78,000, the ceiling
- 5 kW - Central subsidy: ₹78,000
- 10 kW - Central subsidy: ₹78,000
That is ₹30,000 per kW for the first 2 kW and ₹18,000 for the third kilowatt, capped at ₹78,000. Residential Central Financial Assistance is available for systems up to 10 kW, and housing societies or resident welfare associations can claim ₹18,000 per kW for common-area systems up to 500 kW. Collateral-free loans at around 7 percent interest are available for residential systems up to 3 kW.
Two practical points people get wrong. First, the subsidy is a reimbursement. You pay the installer the full amount and the money arrives in your bank account afterwards, so plan the cash flow for the gross figure, not the net one. Second, only an installation done by a vendor registered on the portal qualifies, which rules out self-installation and unregistered contractors.
Tamil Nadu households have one more thing to watch. The Tamil Nadu Budget 2026-27, presented on 5 August 2026, announced a state Rooftop Solar Subsidy Scheme that would take total support to up to ₹1 lakh for a domestic 3 kW system, running in convergence with the central scheme, with ₹50 crore allocated for the year. It is a budget announcement rather than a live scheme: the government order, eligibility rules and application route have not been published yet, and the allocation will fund a limited number of homes. Treat ₹78,000 as what you can count on today.
When comparing installers, get at least three written quotations and check that each names the module make and model, the inverter make and warranty, the structure material and height, and what happens to the paperwork. The full application sequence and the documents each stage needs are set out in the PM Surya Ghar subsidy guide.
Step 6: Get DISCOM feasibility approval
Before anything is bolted to your roof, the distribution utility has to confirm that your connection can take the proposed system. The application goes in through the portal with your consumer number, the proposed capacity, and the system design. The DISCOM checks the capacity against your sanctioned load and against the local distribution transformer's remaining headroom.
This usually takes two to three weeks. Feasibility approval is the green light to install. Installing before it arrives is a real risk, because a system that exceeds sanctioned load may have to be partially dismantled.
Step 7: The installation itself
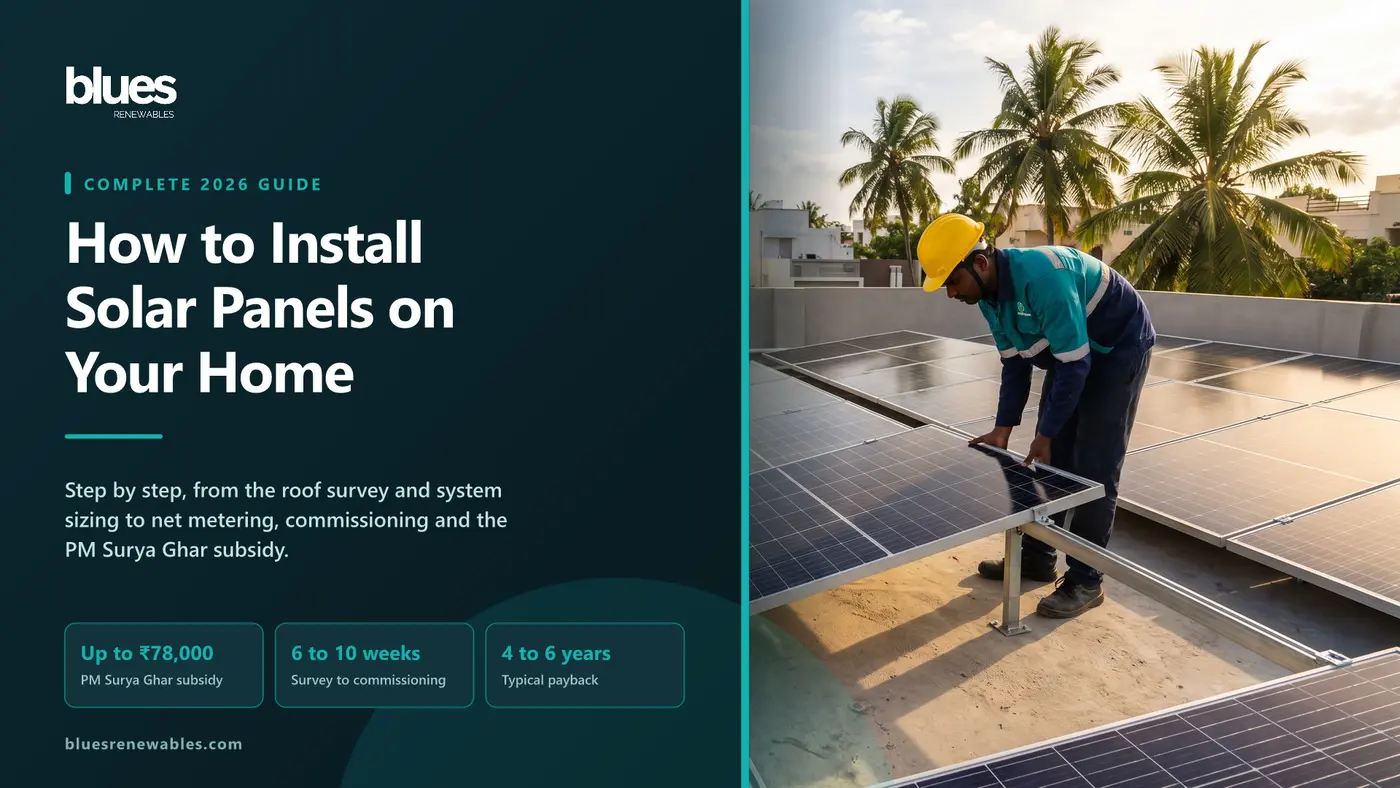
The part everyone pictures is the shortest part of the project. For a typical 3 kW to 5 kW residential system it runs one to three days.
Day one is the structure. The crew marks the roof to the approved layout, casts or chemically anchors the base plates, and erects the galvanised columns and purlins. The structure is levelled and the tilt set. Every anchor penetration is sealed and waterproofed as it is made, not at the end of the job.
Day two is the modules and the DC side. Panels are lifted, set on the rails, and secured with mid clamps and end clamps torqued to the manufacturer's specification. Over-tightening cracks the frame and under-tightening lets the module move in wind. Modules are wired in series into strings that match the inverter's voltage window, DC cable is routed inside UV-rated conduit rather than cable-tied to the structure, and polarity is verified before anything is connected.
Day three is the inverter, earthing and testing. The inverter is mounted somewhere shaded and ventilated, because inverter efficiency and lifespan both suffer in direct sun. Separate earth pits are dug for AC, DC and lightning protection. The AC cable is run to your distribution board through a dedicated breaker. Then the system is tested: string open-circuit voltage against design, insulation resistance, earth pit resistance, and a first generation reading through the monitoring app.
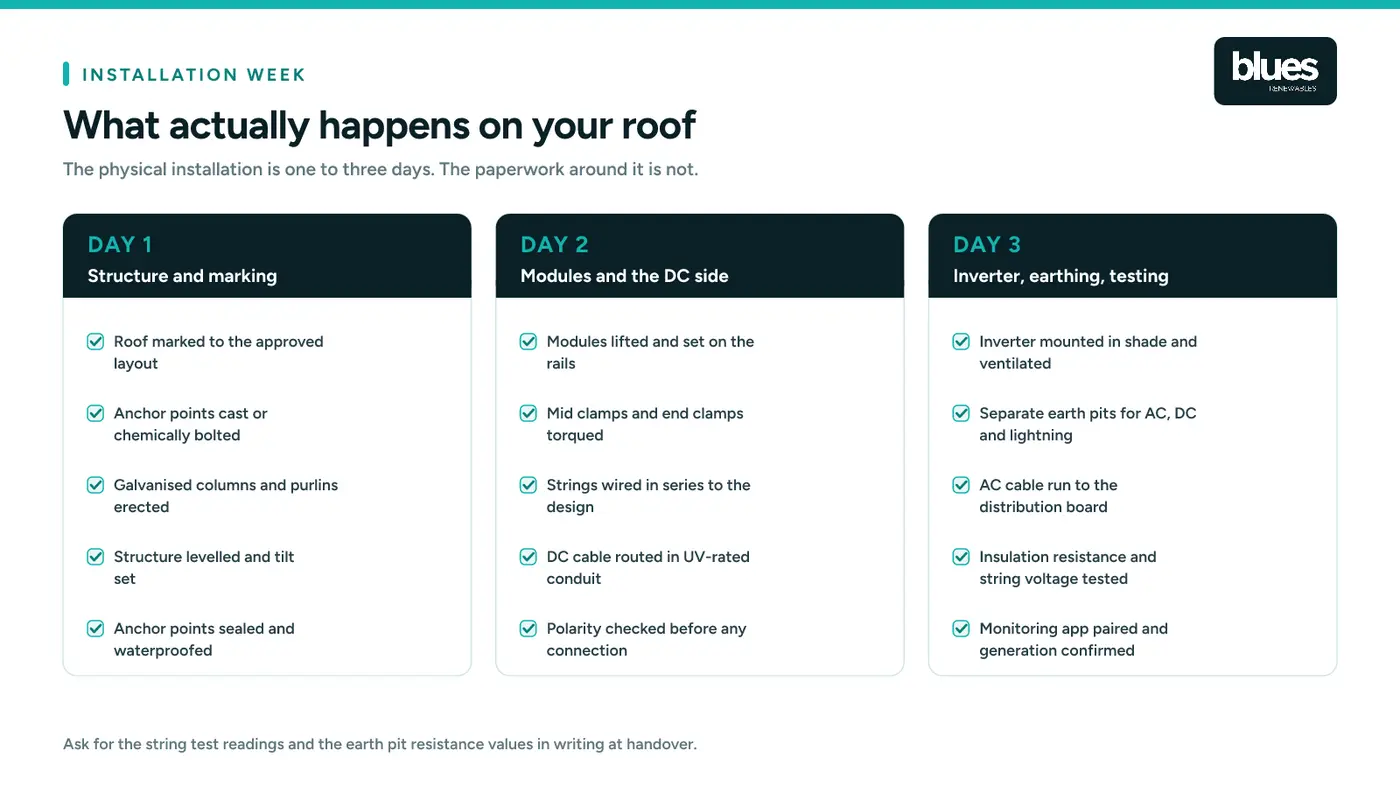
Ask for the string test readings and earth pit resistance values in writing at handover. A crew that measures them will hand them over without hesitating.
Step 8: Net metering, inspection and commissioning
With the system installed, plant details are submitted through the portal and the net metering application goes to the DISCOM. A bi-directional meter replaces your existing meter and records both the units you draw from the grid and the surplus you export. Exported units are credited against your consumption in the billing cycle, and unused credits carry forward to the next one.
The DISCOM then inspects the installation and installs the meter. This is the longest stage of the whole project, commonly four to eight weeks on its own, and no installer controls it. Any installer promising a fixed date for this stage is guessing. What a good installer does control is how complete the file is when it goes in, which is the largest variable in how long the stage takes.
Once inspection and metering are done, the commissioning certificate is generated through the portal. That certificate is what unlocks the subsidy. Bank details and a cancelled cheque are submitted, and the money is transferred directly, typically 30 to 45 days after commissioning.
The application route, the documents involved and the common reasons files get returned are covered in the TANGEDCO net metering application guide.
Can you install solar panels yourself?
Technically, yes. Financially, in India, it removes most of the reason to go solar in the first place.
A self-installed system forfeits the PM Surya Ghar subsidy, because only a registered vendor's installation qualifies. It will not get net metering sanctioned, because the DISCOM will not approve an uncertified installation, which means your surplus generation is simply lost rather than credited. Module and inverter warranties generally lapse without certified installation records, so a panel failure in year six becomes your problem. Roof anchoring done without waterproofing discipline shows up as leaks in the first monsoon. And a residential string operates at DC voltages that are genuinely dangerous, several hundred volts with no zero-crossing, which is a different risk profile from household AC wiring.
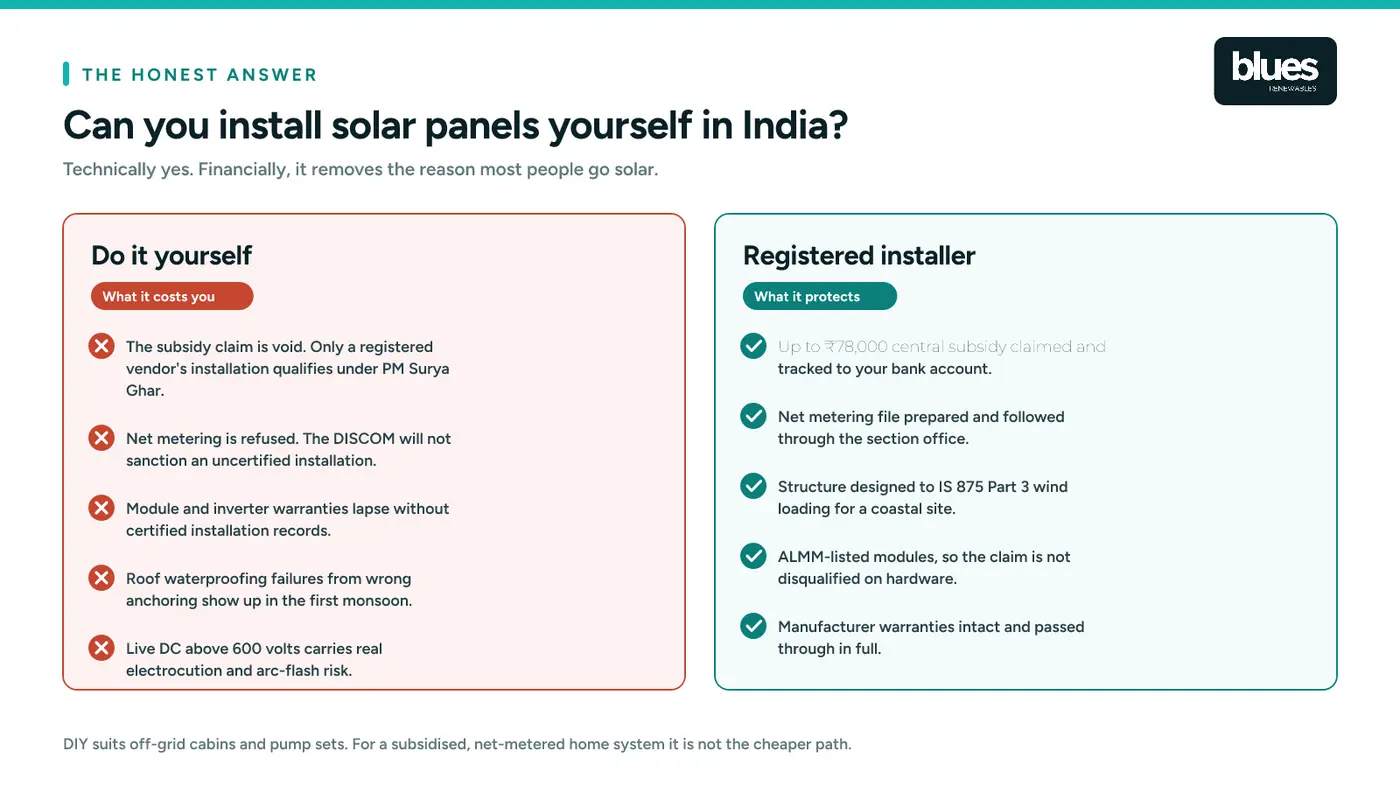
DIY makes sense for off-grid applications: a farm pump set, a cabin, a small standalone system with no grid connection and no subsidy claim. For a subsidised, net-metered home system, it is not the cheaper path.
What it costs, and what comes back
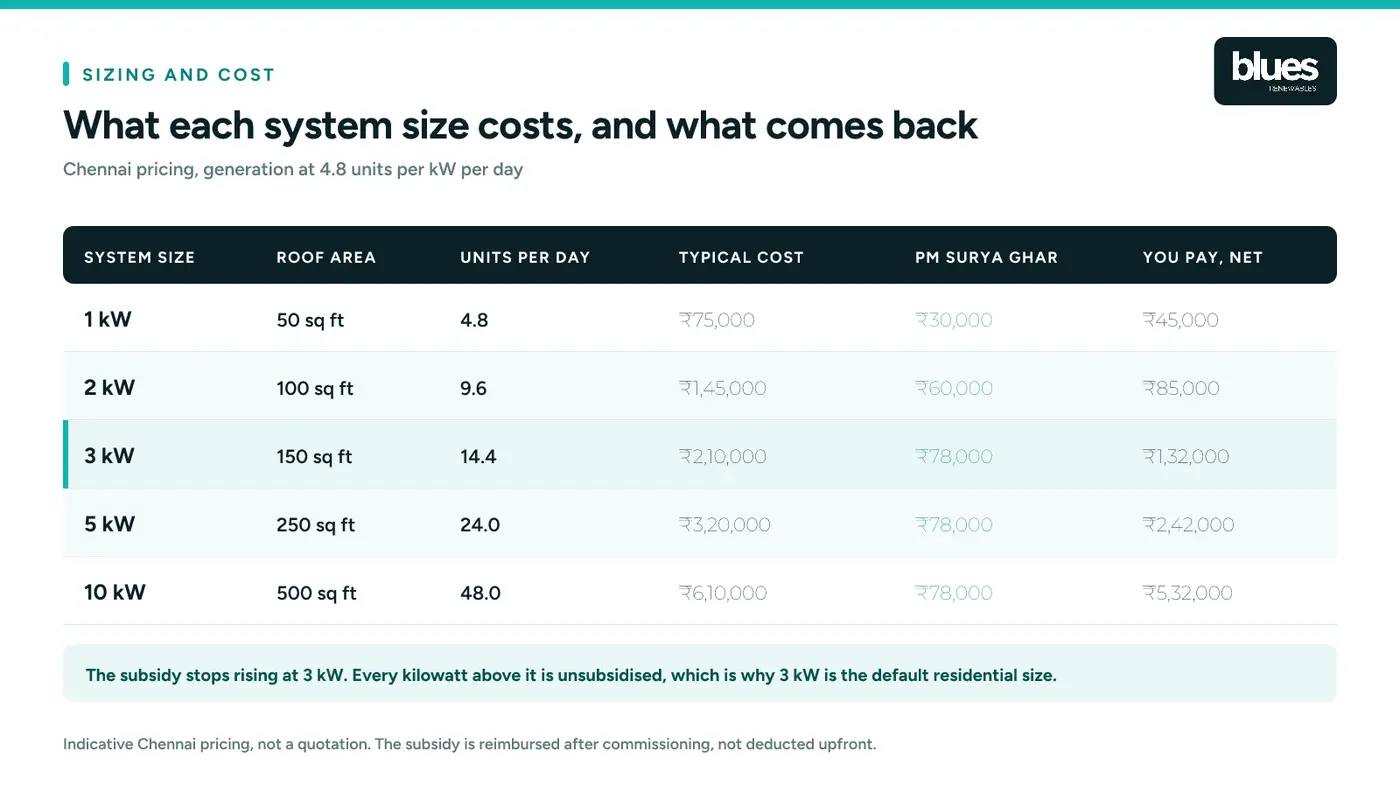
Indicative installed costs for a Chennai home, including structure, cabling, earthing and commissioning:
- 1 kW - Typical cost: ₹75,000, Subsidy: ₹30,000, Net outlay: ₹45,000, Monthly generation: ~144 units
- 2 kW - Typical cost: ₹1,45,000, Subsidy: ₹60,000, Net outlay: ₹85,000, Monthly generation: ~288 units
- 3 kW - Typical cost: ₹2,10,000, Subsidy: ₹78,000, Net outlay: ₹1,32,000, Monthly generation: ~430 units
- 5 kW - Typical cost: ₹3,20,000, Subsidy: ₹78,000, Net outlay: ₹2,42,000, Monthly generation: ~720 units
- 10 kW - Typical cost: ₹6,10,000, Subsidy: ₹78,000, Net outlay: ₹5,32,000, Monthly generation: ~1,440 units
Final pricing moves with panel technology, inverter brand, structure height and roof condition, which is why a real number comes after a site survey rather than over the phone. Most homeowners recover the investment through bill savings in four to six years, on hardware built to run for 25.
One structural point about Indian domestic tariffs is worth understanding: they are telescopic, so the units at the top of your consumption are billed at the highest rate. Solar erases those top-slab units first, which is why the savings on a bill are usually larger than a simple units-times-average-rate calculation suggests.
Mistakes that cost the most
Sizing to the roof instead of the bill. A large roof is not a reason to install 10 kW if you consume 400 units a month. You will export surplus that settles at below retail rates.
Ignoring the sanctioned load. Capacity above sanctioned load gets the file rejected. Check it on your bill and file a load enhancement in parallel if needed.
Buying on price per watt alone. The gap between a cheap quotation and a sound one is almost always in the structure section, the cable specification and the earthing, none of which are visible from the roof once the panels are on.
Skipping waterproofing before installation. The cheapest time to fix a terrace is before the array is anchored to it.
Accepting non-ALMM modules. They may be genuinely good panels. They will still disqualify the entire subsidy claim.
Mounting the inverter in direct sun. It shortens inverter life and costs efficiency on exactly the days generation is highest.
Treating the subsidy as a discount. Budget for the gross amount. The reimbursement arrives 30 to 45 days after commissioning.
After installation: what maintenance actually involves
Rooftop solar is low maintenance, not no maintenance.
Cleaning is the main task. Dust, coastal grit and bird droppings reduce output measurably. In most Indian cities a wash every two to four weeks in the dry months is sensible, more often in dusty periods and less during the monsoon. Use plain water in the early morning or evening, never cold water on hot glass in the middle of the day.
Monitoring matters more than cleaning. Check the app weekly and compare generation against the same month last year. A sudden step down usually indicates a string fault, an inverter error or a newly shaded module. A slow decline usually means soiling.
Annual checks should cover clamp torque, structure fasteners for corrosion, earth pit resistance, DC connector integrity and inverter filters. Expect around 0.5 percent output degradation a year, which is normal and covered by the performance warranty; anything sharper is a fault, not ageing.
Frequently asked questions
How long does it take to install solar panels on a home? The physical installation takes one to three days for a typical 3 kW to 5 kW residential system. The full project, from application to a commissioned and net-metered system, commonly takes six to ten weeks in urban India. The DISCOM inspection and meter installation stage is the longest, usually four to eight weeks on its own.
How many solar panels do I need for my house? It depends on consumption, not house size. At about 4.8 units per kW per day, a home using 300 units a month needs roughly 2 kW, which is four modules of 545 W. A home using 430 units a month needs about 3 kW, or five to six modules. Check twelve months of bills rather than one, since consumption swings with the season.
How much roof space do solar panels need? Roughly 50 square feet of shadow-free area per kilowatt. A 3 kW system needs about 150 square feet, a 5 kW system about 250 square feet. Area shaded between 9 am and 4 pm does not count toward this.
How much subsidy can I get for home solar in India? Under PM Surya Ghar Muft Bijli Yojana, ₹30,000 for a 1 kW system, ₹60,000 for 2 kW and ₹78,000 for 3 kW and above. The amount is capped at ₹78,000 regardless of how much larger the system is, and residential Central Financial Assistance is available for systems up to 10 kW. It is credited to your bank account after commissioning.
Can I install solar panels myself in India? You can physically do it, but a self-installed system does not qualify for the PM Surya Ghar subsidy, will not be sanctioned for net metering, and typically voids module and inverter warranties. For a grid-connected home system, using a registered installer is both the cheaper and the safer route. DIY is reasonable only for off-grid setups with no subsidy or net metering involved.
Do solar panels work during a power cut? An on-grid system does not. It shuts down automatically during an outage as a safety requirement, so that it does not energise lines that utility staff may be working on. If you need power during cuts, you need a hybrid system with battery backup, or a battery added to an existing on-grid system.
Which direction should solar panels face? South, in the northern hemisphere, at a tilt roughly equal to your latitude. East and west orientations typically lose only 8 to 15 percent of annual output, so they remain viable. On a flat terrace the mounting structure sets both angle and direction, so the building's orientation does not constrain you.
What is the 120 percent rule for solar panels? It is an electrical safety rule limiting how much solar can be backfed into a distribution board: the sum of the main breaker rating and the solar backfeed breaker rating should not exceed 120 percent of the busbar rating. It originates in the US National Electrical Code, and the equivalent constraint in India is that your system capacity must stay within your sanctioned load.
Do I need to replace my roof before installing solar? Not necessarily, but if the terrace needs waterproofing or the roof has fewer than about ten years of life left, do that work first. Removing and reinstalling an array later to fix a leak is a significant avoidable cost.
How long do solar panels last? Modules typically carry a 25 to 30 year performance warranty with degradation around 0.5 percent a year, so they should still deliver roughly 85 percent of rated output at year 25. Inverters are the shorter-lived component, usually needing replacement once in that period, commonly between years 10 and 15.
Is solar worth it if I plan to sell the house? A commissioned, net-metered system transfers with the property, and the subsidy is tied to the connection rather than to you personally. The buyer inherits both the generation and the remaining warranty period, and a documented system with test readings and warranty papers is straightforwardly transferable.
Getting it done
The technical part of installing solar panels on your home is well understood and takes days. The part that determines whether the project runs to six weeks or to six months is the paperwork: a feasibility application that matches the sanctioned load, a net metering file that goes in complete, and a subsidy claim tracked through to disbursal.
Blues Renewables has been installing rooftop solar in Chennai since 2020 across homes, schools, businesses and factories. We survey the roof, size the system against your actual consumption, file the PM Surya Ghar application and the net metering file, attend the DISCOM inspection, and track the subsidy to your bank account. Every installation includes two years of free maintenance.
Call +91 98841 07170 for a free site assessment. If you would rather start with the paperwork, the PM Surya Ghar subsidy guide sets out every document and stage before you commit to anything.
Sources
- Ministry of New and Renewable Energy and Press Information Bureau, solar capacity and PM Surya Ghar progress data, 2026
- PM Surya Ghar Muft Bijli Yojana official portal, pmsuryaghar.gov.in
- Lok Sabha reply by the Minister of State for New and Renewable Energy on PM Surya Ghar installations, March 2026
- Tamil Nadu Budget 2026-27, Rooftop Solar Subsidy Scheme announcement, 5 August 2026
- IS 875 Part 3, wind load design standard